Leave Request options
The following tasks can be accomplished via this menu:
Check a submitted Leave Request
Cancel a submitted Leave Request
How do I add a document to a Leave Request
How to create a Leave Request:
- Open the Leave Details menu
- Select Leave Request
- On the Submitted Leave tab, click Add Leave Request
- Specify the Leave Type, Reason (this is a mandatory field, but you can retain ‘Not Specified’ if preferred) and To and From Dates
- Tick the relevant ‘Include’ boxes if the time span includes Saturdays or Sundays or Public Holidays and you would normally work on these days.
- Click Calculate – this will show the total number of hours requested, and the days you requested will be highlighted. Ensure the dates and number of hours being requested are correct.
- If you are applying for a partial day, click Calculate, then click the relevant date on the calendar.
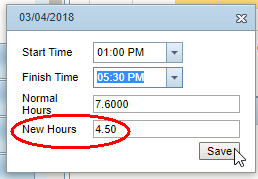
- On the window displayed for that date, use the drop-down arrows to specify the start and finish time - this is the span of time you want to take as leave. It will show the hours requested in New Hours:

- Once submitted, the request will be emailed to the specified approver. Click
 if you want to search for an additional approver to receive a CC of the email notification that the request was submitted.
 - Check the Leave Balance and projected entitlement details displayed.
- If all is correct click Submit. The request email(s) will be sent to the designated Manager/Approver(s). You will receive a copy of this email.
- When there is any change in status of the leave request (e.g. approved or escalated) , emails will be sent to you and to the Manager/Approver.
Check a submitted Leave Request:
- Open the Leave Details menu
- Select Leave Request
- View the Submitted Leave tab
This will show all leave requests that have not yet had a response - If required, click Edit and make the changes
- Click Calculate to check the dates and hours
- Click Save. A new email will then be sent to the Manager/Approver(s)
Cancel a submitted Leave Request:
- Open the Leave Details menu
- Select Leave Request
- View Submitted Leave tab – this will show all leave requests that have not yet had a response.
- Click Update
- Add an explanation in the Notes(requester) field
- Click Cancel Leave
- A new email will be sent to the Manager/Approver(s)
A leave request cannot be cancelled by the employee once the request has been approved. However, the approver (e.g. Manager) can cancel the request if necessary. The Payroll Administrator is the only person who can modify or cancel a request with the status ‘Approved’.
Check Leave History
This will show leave that has been approved, but not yet taken:
- Open the Leave Details menu
- Select Leave Request
- View Approved Leave tab
Reports
There are two additional options for checking leave history, using the Reports menu option.
My Leave History
This option will show a history of leave taken within a specified date range:
- Open the Reports menu
- Select My Leave History
- Specify To and Fromdates
- Click Search to display data for that date range
- Click Report to generate a PDF report of the data displayed
My Leave
This Reports option gives you a quick view of Leave Requests, Leave Processed, or Leave Approved, using the tabs. Alternatively, the Report button (on each of the three tabs) provides a PDF report detailing all Leave Requests, Leave Processed, and Leave Approved as at the current date.
Optional: How do I add a document to a leave request
Sometimes you may submit a request that needs to have a document attached, like a Doctor’s certificate, or an Army Reserve or CFA letter. The document needs to have been saved to your computer as a file, in order for you to attach it to a leave request.
A document can be added to a leave request once the request has been created and saved, or after the request has been submitted, but not once the request has been approved. When you add a document to a submitted request, an email notification is sent to the approver.
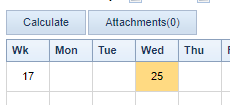
- After you have clicked Calculate, the Attachments button becomes available above the dates of the leave:

- Click the Attachments button. At the prompt Save the leave entry.
- Click Add in the Documents window. Browse to locate the required document, then click Open – this will add the document name to the File Browse window.
- Type in a name for the attachment, then click Save. Click OK on the confirmation message, then close the Documents window.
Note that you can also apply Security to the document. You are advised to contact your kiosk administration staff member, or supervisor, for advice on this. - If this is all correct, and you want to send it for approval, click Submit.
Note: If you choose to click Save, this will keep the leave request details you have entered, but will not send a copy to the relevant person/people for approval. This means you can edit the leave request if required, prior to submitting it for approval. - The request email(s) will be sent to the designated Approver(s). You will receive a copy email.
Note that once this leave has been approved (or denied), you will receive an email notification.
Return to Common Tasks (e.g. Annual Leave, Payslips)
